


After clicking on a product listing, the item will open in the Edit Product Details page.
At the top of this page, you can use the "Back to Presentation" link to return to the main the presentation configuration page.

Which field(s) would you like to update?
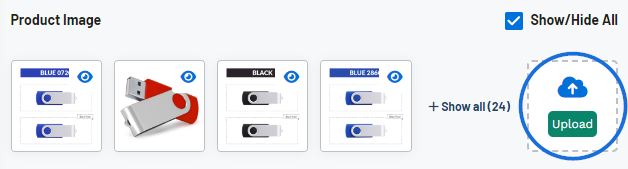
Product Images
All supplier provided product images will be displayed in the Product Image section. Each image will be shown with a thumbnail and a small eye icon. The eye icon indicates whether the image will be displayed on the presentation. All uploaded images will be displayed as thumbnails in the Product Image section. You can use the show/hide link to select all images or no images to display in the presentation. You can also use the icon in the upper right corner of the thumbnail to select individual images to show or hide.
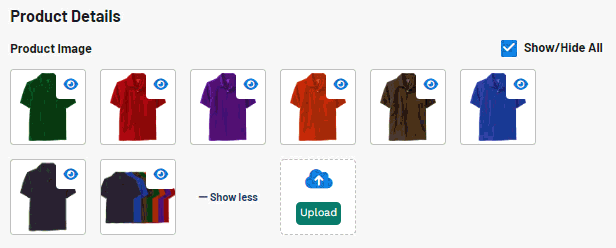
To reorganize how images are displayed in the customer facing presentation, click on the color tile to drag and drop it to the desired location. Dragging and dropping will reorganize the product images in the Product Image section of the presentation editor as well as their order in the vertical carousel of the customer presentation.
Watch a quick video on reorganizing images
Can I create a virtual sample?
Yes, you can add create a virtual sample using any product image you'd like. For more information, please review the Virtual Sample article.
How do I add a custom image?
You can add a custom image by uploading it from your computer. To use an image from your computer, click on the Upload button at the bottom of the Product Image section.
Uploaded images should be:
- Minimum of 110 pixels by 110 pixels
- Under 2 MB in size
- In a .jpeg, .jpg, .png or .gif format
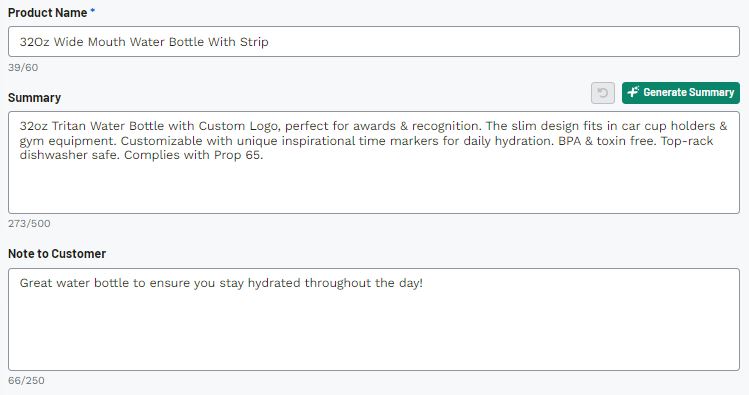
Product Name, Summary and Note to Customer
The product name field will be automatically filled in with the information provided by the supplier. Product name is a required field, but the text can be updated. There is a maximum of 60 characters for this field.
The description field will be automatically filled in with the information provided by the supplier. Description is not a required field, and the text can be updated. You can use the Generate Description button to have AI craft an information blurb for you. There is a maximum of 850 characters for this field.
Note to Customer is an open text field for up to 250 characters where you can type any information you’d like to convey to your customer.
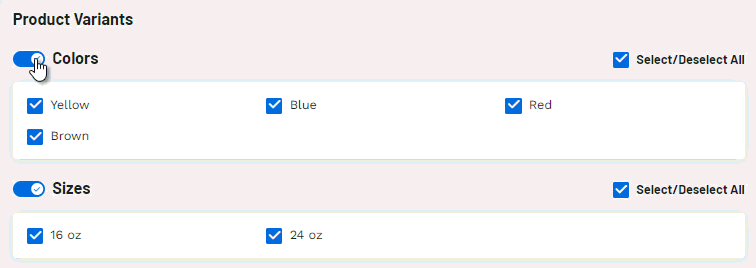
Product Variants
Product variants are the descriptive information about the product, such as color, size, material, and shape. All options provided by the supplier for each section will be shown as individual options. Use the checkbox next to an option to select whether to have it be visible on the presentation. Checked options will be displayed, unchecked options will not.
You can use the slider to choose whether to show or hide a field in its entirety.
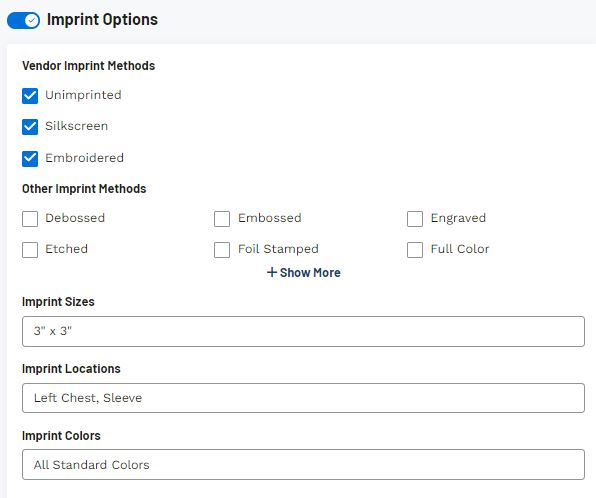
Imprint Options
If the supplier provides imprinting on an item, the Vendor Imprint Methods section will display the available options from the supplier. To include an additional imprint method on the presentation, check the option in the Other Imprint Methods area.
There are also fields available for imprint size, location, and colors.
Price Range
The Price Range will be displayed above the price grid(s) on the customer facing presentation. The Price Range will be generated from the lowest list price (usually for the highest quantity) to the highest list price (usually for the lowest quantity). If adjustments have been made to the list price information, the price range will reflect the modified pricing.
Pricing
To ensure pricing information is displayed for an item, make sure the slider for Pricing is activated.

Before making any price alterations there needs to be at least one price grid selected for the product. If the product has a single price grid for all available options, that price grid will be automatically selected and listed in the Price Grid area. Click on the arrow to expand the grid and begin editing the information.
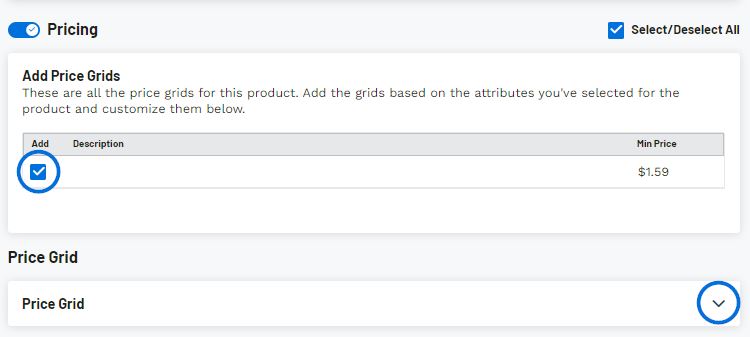
If the item has more than one price grid, each will be available for use in the Add Price Grids section. Check the box in the Add column for the grid(s) you would like to use. The price grid will then move into the Price Grids section where you can begin editing the pricing information. Price grids will not display on the presentation until they are in the Price Grid section. Click on the arrow to expand the grid and begin editing the information. To add all available price grids, check the Select/Deselect All checkbox.
Watch how to add multiple price grids
Once you have at least one price grid added, use the dropdown in the Adjust All Prices Based On section to select an adjustment option. Enter either the percentage or fixed amount in the available box and then click on the Apply button.
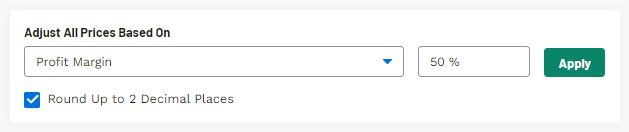
Use the checkbox to have the list price will be displayed with two decimal places.
What does each adjustment option do?
- Profit Margin
Update the profit margin for all quantities. - Add Fixed Amount To The List Price
Update the list price by adding a set amount to the existing list price. The profit margin will automatically adjust. - Add Fixed Amount To The Net Cost
Update the net cost by adding a set amount to the existing net cost. The profit margin will automatically adjust. The List Price will not change. - Add Fixed Amount To The List Price From The Net Cost
Update the list price by adding a set amount to the net cost. The profit margin will automatically adjust. - Subtract Fixed Amount To The List Price
Update the list price by subtracting a set amount from the existing list price. The profit margin will automatically adjust. - Subtract Fixed Amount To The Net Cost
Update the list price by subtracting a set amount from the existing list price. The profit margin will automatically adjust. The list price will not change. - Subtract Fixed Amount To The List Price To The Net Cost
Update the list price by subtracting a set amount from the net cost. The profit margin will automatically adjust. - Add Percentage Of Net Cost To The List Price
Update the list price by calculating a percentage of the net cost and then adding that amount to the net cost. The profit margin will automatically adjust. - Add Percentage Of The List Price To The List Price
Update the list price by calculating a percentage of the existing list price and then adding that amount to the existing list price. The profit margin will automatically adjust. - Add Percentage Of The Net Cost From The Net Cost
Update the net cost by calculating a percentage of the existing net cost and then adding that amount to the existing net cost. The profit margin will automatically adjust. The list price will not change. - Subtract Percentage Of The Net Cost From The Net Cost
Update the net cost by calculating a percentage of the existing net cost and then subtracting that amount from the existing net cost. The profit margin will automatically adjust. The list price will not change. - Subtract Percentage Of Net Cost From The List Price
Update the list price by calculating a percentage of the net cost and then subtracting that amount from the net cost. The profit margin will automatically adjust. - Subtract Percentage Of The List Price From The List Price
Update the list price by calculating a percentage of the existing list price and then subtracting that amount from the existing list price. The profit margin will automatically adjust.
In addition to adjusting all prices, you can select which quantities you would like to have shown on the customer facing presentation. For example, if the supplier provided price breaks at 50, 100, 200, 300, and 500; but you only wanted to give your customer breaks at 200 and 500. To do this, uncheck the visible checkbox at the top and then click on the eye icon for the 200 and 500 rows.
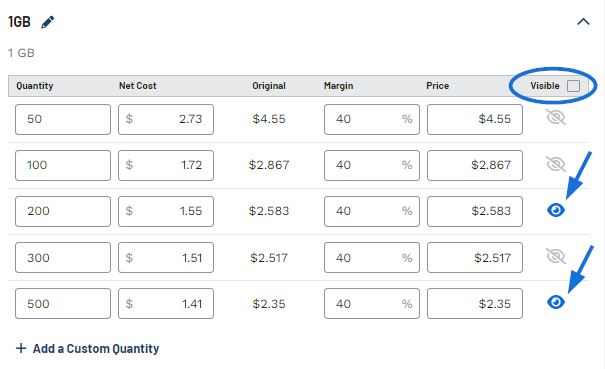
Use the Add a Custom Quantity link to include custom price breaks.
If the supplier provided a price includes statement, it will be automatically displayed in the Price Includes box. If desired, you can replace the existing text or add additional details.
Client Discount Range
If the Client Discount has been activated, a flag reading "Discount Applied" will be displayed below the summary on the customer facing presentation.
Additional Charges
In the Additional Charges section, any charges from the supplier and/or custom charges can be displayed in the product information. Charges provided by the supplier will be displayed with an "Add" checkbox. Checking this box will move the charge into the Charges section and make it visible on the presentation.
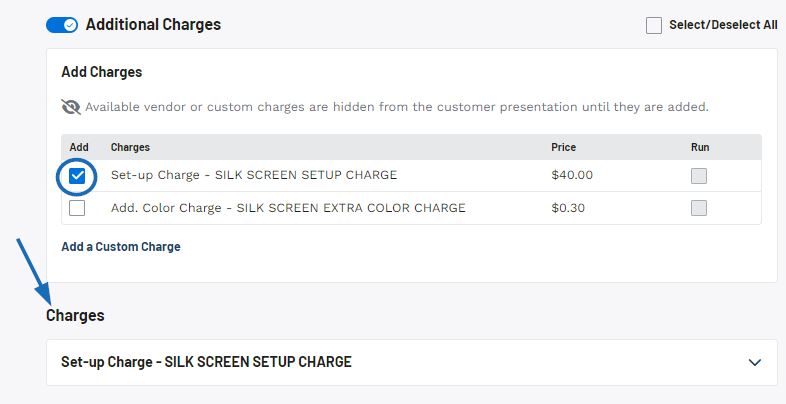
Clicking on the Add a Custom Charge link will add a Set-up Charge, but this can be modified when the charge is configured.
When you are finished customizing the information for this product, click on the Save Changes button at the top.

You can also click on the Preview button to open the product page in a new tab. The Preview enables you to review the product page as if you were a customer.
The Cancel button will remove any changes you have made since your last save.
Use the "Previous Product" and "Next Product" links to continue editing various products within the presentation.

 Français
 Español