


The Preferred Suppliers area enables you to create and apply Preferred Supplier Lists in ESP+ for your entire company. Please note, in order to be a Preferred Supplier Administrator, you will need a specific license. To obtain this license, you will need the primary contact at your organization contact the ASI Technical Product Support team via email at support@asicentral.com or by phone at (800) 546-1350, prompt 2.
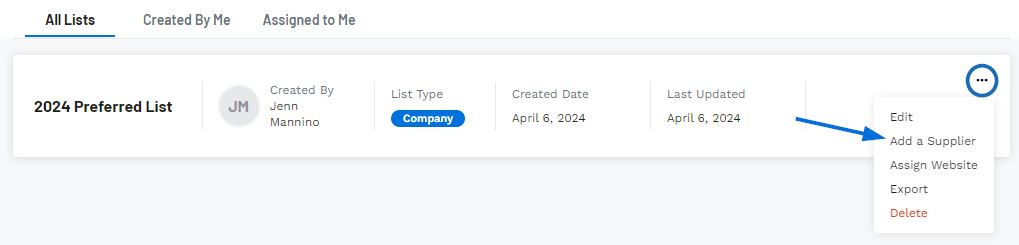
After a preferred supplier list has been created, it will be available in the All Lists section, along with any other lists created by administrators within your company. To view only lists you have created, click on the Created By Me section. Additionally, to view all lists that have been assigned to you from other preferred supplier administrators, click on the Assigned to Me section. In each section, all applicable lists will be displayed.
Create a New List
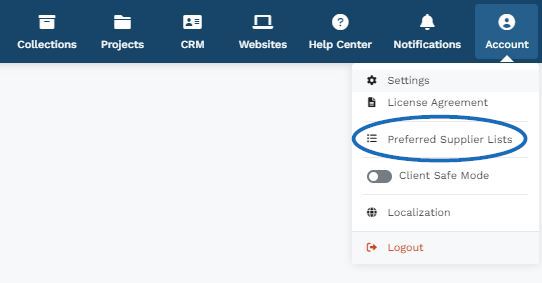
To create a new preferred supplier list, expand the account options and select Preferred Supplier Lists.
Next, click on the Create a New List button.

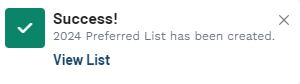
In the Create a New Preferred Supplier List window, type a List Name and a list description. The List Name is a required field, the list description is optional. When you are finished entering information, click on the Create List button.

You will recieve a success message in the lower right corner and the newly created list will be available in the All Lists section.
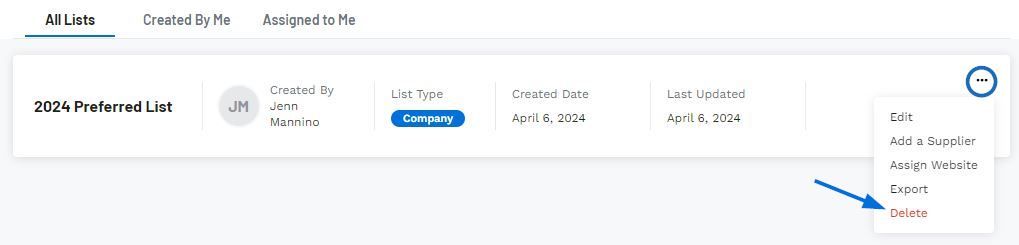
Manage a List
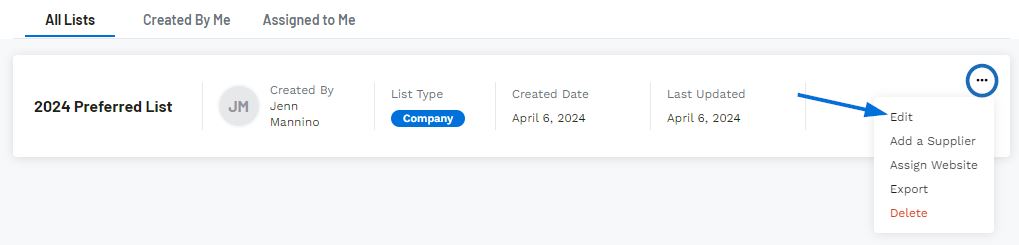
To manage a list, click on the three dot icon to the right. The Edit options enables you to update the list name and description, add and/or import suppliers for this list, rank and pricing for individual suppliers within the list, and export suppliers.
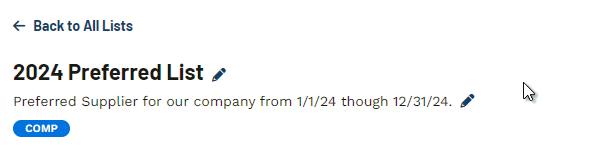
Update the List Name/Description
To update the list name and/or description, click on the pencil icon to the right of the field. Enter the changes you would like to make and then click on the Save option. The information will now be updated.
Add a Supplier
To add a supplier to a list, click on the Add Supplier button.

In the Add a Supplier window, enter the supplier's name or ASI number. As you type, matching results will be displayed below the search bar. Click on the supplier you would like to add. After clicking on the Supplier's name, you will be able to choose their rank and add any applicable pricing adjustments.
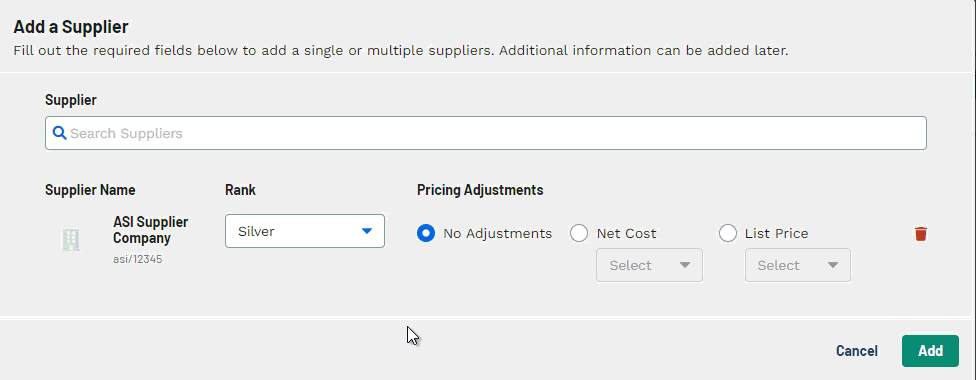
You can continue to search, select, and configure suppliers by repeating the steps above. When you are finished adding suppliers, click on the Add button.
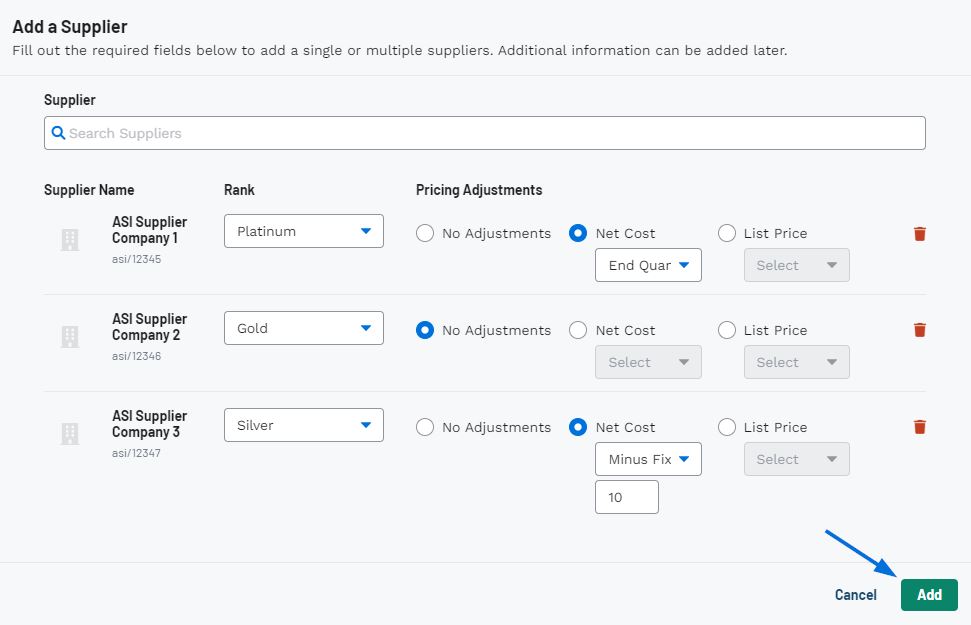
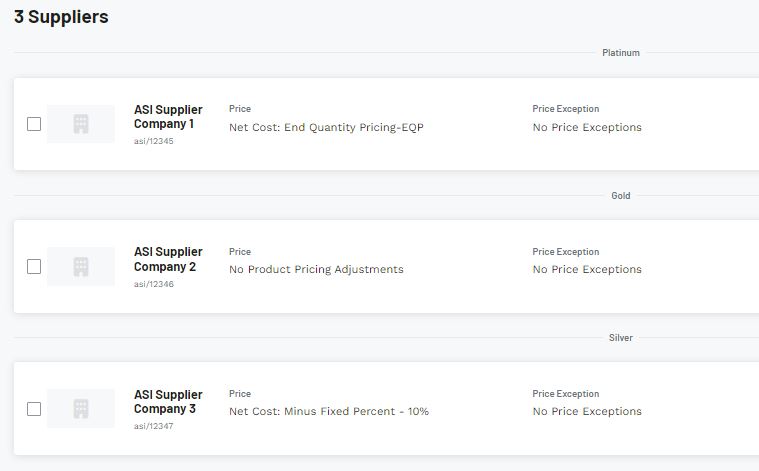
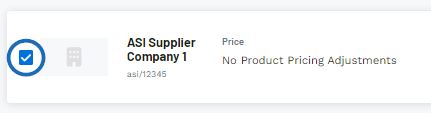
The selected suppliers will now be added to the list and grouped by their ranking, with the highest level displayed first.
Import Suppliers
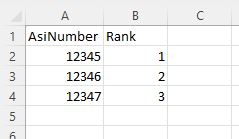
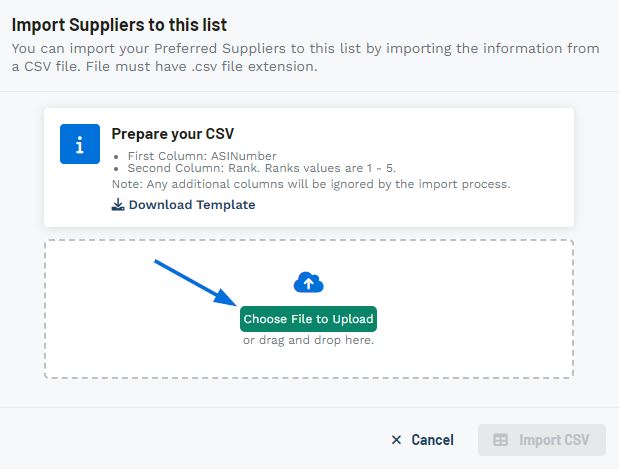
If you have a list of preferred suppliers in a CSV format saved onto your computer, you are able to import it into ESP+ by clicking on the Import List button.

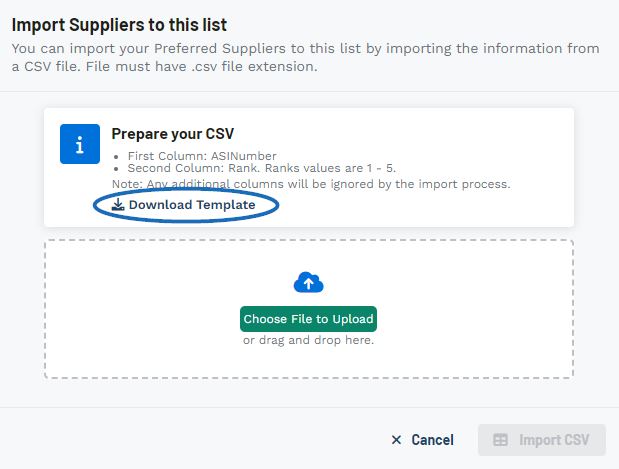
There are a few preparation steps that must be taken prior to import.
- Ensure that your file is in a CSV format.
- The file must contain ASINumber in the first column and Rank in the second column. The rank values are from 1 - 5 with 1 being the highest rank and 5 being the lowest. It is important to note that any additional columns will not be imported.
If you would like to build a file, click on the Download Template link.
When your file is ready to import, click on the "Choose File to Upload" button or drag and drop the file to the box.
The file will be listed in the Selected File area. Next, click on the Import CSV button.
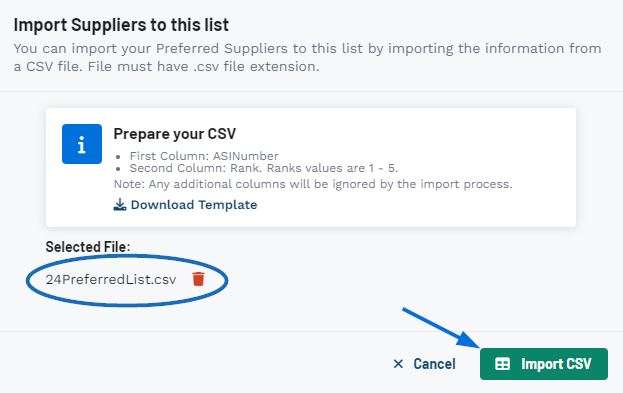
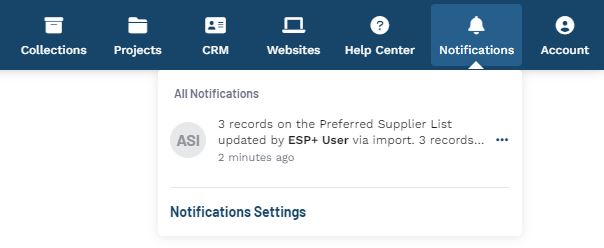
A success message will appear in the lower right corner and it may take a few minutes for the file to fully import. Once the file has been imported, a notification will appear in the main toolbar and the preferred suppliers will be available in the list. If you have recieved a notification but do not see the imported suppliers, you may need to refresh the browser.
Manage Supplier Rank and Pricing
To update the rank and/or pricing for a supplier, click on the three dot icon and select Edit Supplier Rank & Price.

In the Edit Rank and Price window, use the available fields to update the information for the preferred supplier.
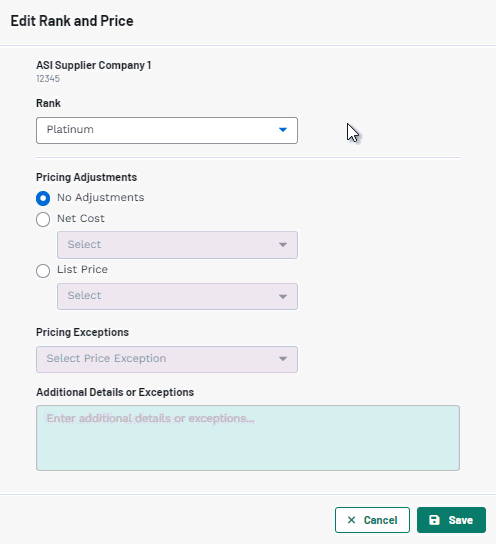
If you need to create exceptions to the preferred pricing, you can use the Price Exceptions dropdown. A price exception is when a supplier offers special pricing with the exception of products in a specific category, brand, quantity, or quantity column.
- NQP/EQP
Next Quantity Pricing, abbreviated to NQP, means that the supplier will enable the distributor to order using the net cost for the next quantity. For example, if a distributor wanted to order 100 units, with NQP, they would pay as if they were ordering as many as the next price break. End Quantity Pricing, abbreviated to EQP, means that the supplier will enable the distributor to order using the net cost for the final or end quantity. For example, if a distributor wanted to order 100 units, with EQP, they would pay as if they were ordering as many as the final price break.
Learn more about NQP and EQP - Categories, Brands, or Linenames
If the preferred pricing does not apply to items within a specific category, brand, or linename, select the appropriate option from the Pricing Exceptions dropdown and then use the search box directly below it to choose the applicable option. - Quantity
If an exception is applied to a quantity, the preferred pricing will not be applied to any quantities below the designated threshold. This means that if you select quantity and then use the box below to enter the numerical value. All quantities below the value entered will be excluded from preferred pricing. - Quantity (Break)
If an exception is applied to a quantity column, the preferred pricing will not be applied to any quantities or columns below the designated threshold. This means that if you select column 3 as the pricing exception, all pricing in column 1, 2, and 3 will be excluded from preferred pricing.
Update Rank for Multiple Suppliers
To move suppliers within a list from one rank to another, check the box on the supplier listing.
A toolbar will appear at the bottom with the amount of select suppliers. Clicking on the Move button will display all the available ranks. Click on the rank to where you would like to move the selected suppliers.

Removing Suppliers from a List
To remove a single supplier from a list, click on the three dot on the supplier's listing and select Delete.

The supplier will now be removed from the list.
To remove multiple suppliers from a list, check the box on the supplier listing.
A toolbar will appear at the bottom with the amount of select suppliers. Click on the Remove button.

The selected suppliers will now be removed from the list.
Export Suppliers
You can export the full list of suppliers or select specific suppliers within a list to export.
- Export All Suppliers
To export a list of all suppliers within a preferred list, click on the Export Suppliers button.
- Export Specific Suppliers
To export specific suppliers, check the box on the supplier listing.
A toolbar will appear at the bottom with the amount of select suppliers. Click on the Export button.
The export will be downloaded to your computer as a CSV file and contain the following columns (column headers will appear without spaces):
- ASI Number
- Rank
- Company Name
- Preferred Pricing
- Pricing Exceptions
- Additional Details Or Exceptions
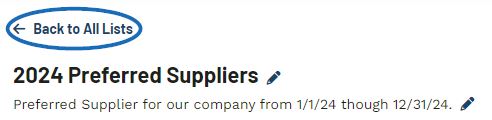
When you are finished adding suppliers and managing the information within a list, click on the "Back to All Lists" link.
Add a Supplier
To add a supplier to a list, click on the Add Supplier option.
In the Add a Supplier window, enter the supplier's name or ASI number. As you type, matching results will be displayed below the search bar. Click on the supplier you would like to add. After clicking on the Supplier's name, you will be able to choose their rank and add any applicable pricing adjustments.
You can continue to search, select, and configure suppliers by repeating the steps above. When you are finished adding suppliers, click on the Add button. The information within the list will be updated, but you will remain in the main lists section. To view the information within the list, click on the listing or use the three dot icon to select "Edit".
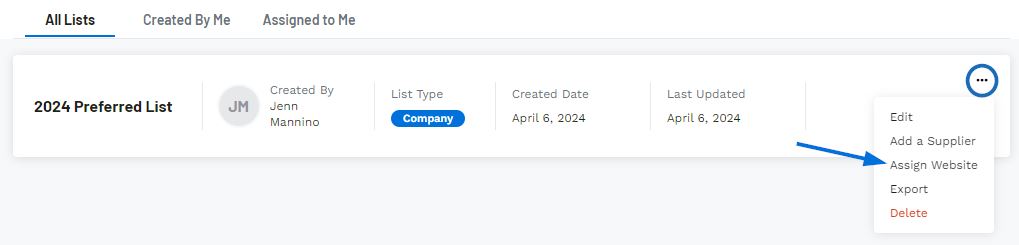
Assign Website
To assign a preferred supplier list to your website, click on the three dot icon and select Assign Website.
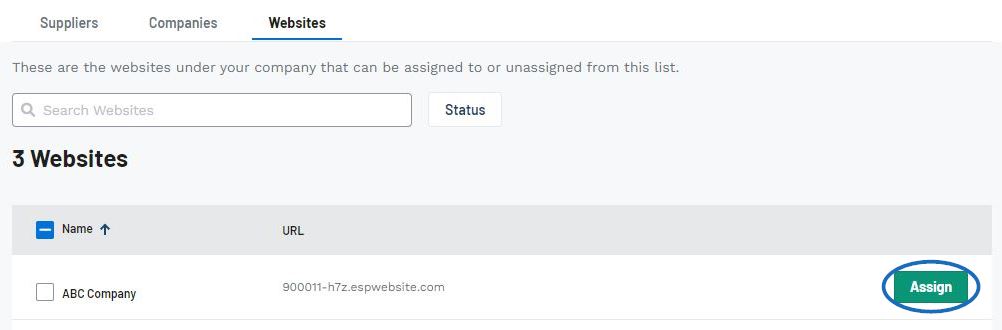
You will be brought into the Websites section of the Edit List area. In this section, all available websites for your company will be listed.
To assign the list to a single website, click on the Assign button on the website listing. The Assign button will now display as "Unassign". To remove a list from a website, click on the Unassign button.
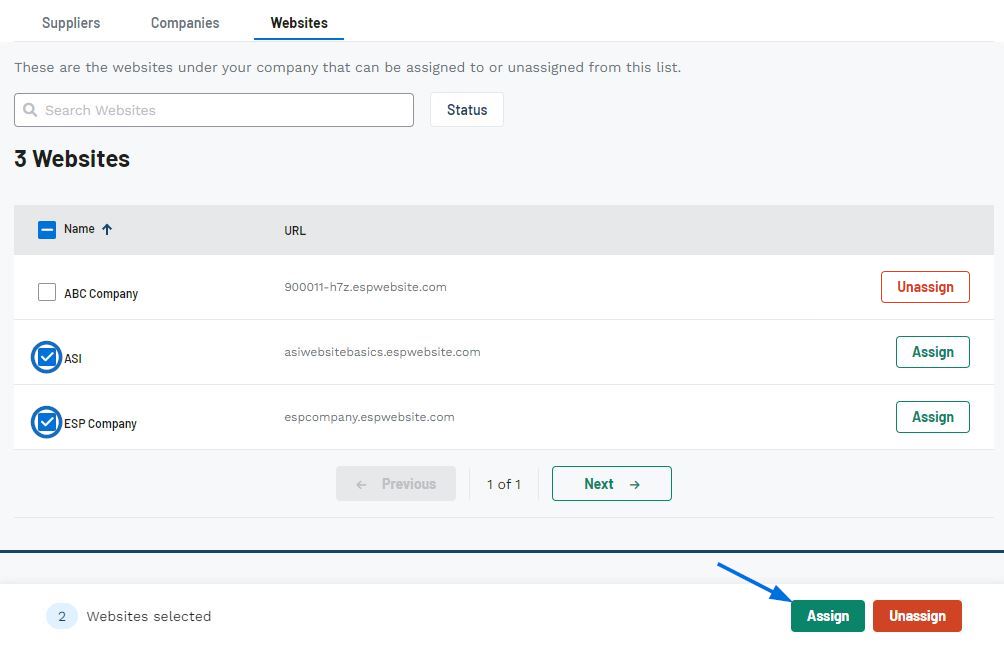
To assign the list to multiple websites, click on the checkbox for the website listing, then click on Assign from the toolbar at the bottom. The Assign button will now display as "Unassign" for the selected websites. To remove a list from multiple website, mark the websites from which you would like to remove the lists and then click on the Unassign button from the toolbar on the bottom.
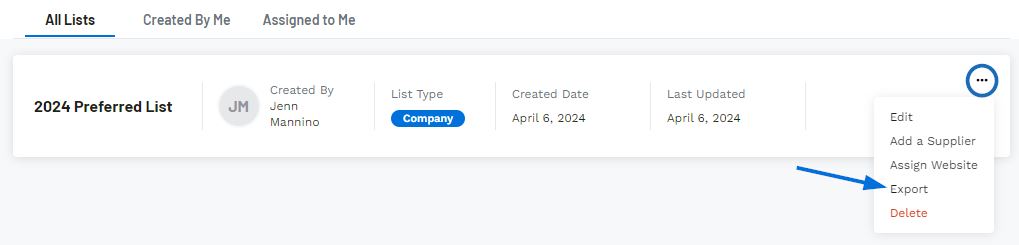
Export Suppliers
To export a preferred supplier list, click on the three dot icon and select Export.
You can export the full list of suppliers or select specific suppliers within a list to export. The export will be downloaded to your computer as a CSV file and contain the following columns (column headers will appear without spaces):
- ASI Number
- Rank
- Company Name
- Preferred Pricing
- Pricing Exceptions
- Additional Details Or Exceptions
Delete
To permanently delete a preferred supplier list, click on the three dot icon and select Delete.
You will be prompted to ensure that you would like to delete this list, as this is a permanent action and all preferred supplier rankings and pricing information will be removed from ESP+. Confirm by clicking on Delete and the list will be removed from ESP+.
 Français
 Español