

To manage pages in ESP+ click on the Pages tab in the websites admin area. In the pages section, all available pages for your site will be listed alphabetically. To update the page, click on the three-dot icon and then click on Edit.
Elements
Elements are design modules that can be added to your custom website page. The elements available are:
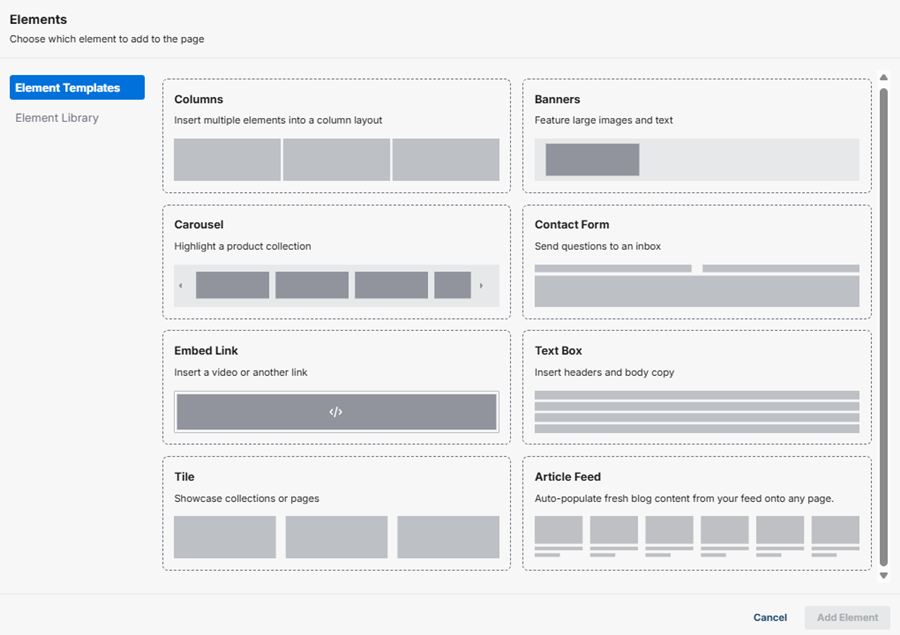
Columns
Columns allow you to add multiple elements in a column layout.
From the Elements window, selecting Columns and then clicking on the “Add Element” will enable you to utilize additional elements within a column structure.
For example, if you want to display a text box and a video side by side, click on the plus sign to add a second column. Then, click on “Column 1” and then click on the “Add Element” button. Now, select Text Box from the available options and then click on the “Add Element” button. You will then be able to configure the text as needed. As you update the content in the Text Box, the preview will update instantly and automatically. When you have finished configuring the text, click on “Column 2” and then click on the “Add Element” button. Now, select “Embed Link” from the available options and then click on the “Add Element” button. Then, enter the URL for the video and click on the insert button.
You can add up to four columns per element and columns can also be stacked.
Banners
From the Elements window, select “Banners” and then click on the “Add Element” button.
You will then need to configure the banner. Click on the “Choose Image to Upload” button to browse your computer for the image or click on the “Select from Library” button to choose an image from the content library. You can also drag and drop an image to the available box.
Next, enter alt text for the banner image. Alt Text provides browsers with a short description of the image and can be read by screen reader software. If you would like to link the banner to a video, enter the link to the video in the field.
You will be able to configure the Header, Body Text for the banner. If you’d like to add a button, click on the link, and choose where the button should direct visitors to your site: an existing page on your ESP+ Website or to a new website. Set the designation for the link and then type a name for the button.
Lastly, you can configure the appearance (dark or light background) and the overlay location (left, center, or right aligned) for the header and body text, as well as the button if you chose to use one.
You can have up to three banners shown on rotation for a single element. Click on the “Add Another Banner” button to configure additional banners for this element. If you wanted to have the banner image as a standalone image, upload the image and add the alt text, but then you could leave these fields blank.
When you have finished configuring the content for the module, click on the “Save Changes” button.
Collection
From the Elements window, select “Collection” and then click on the “Add Element” button.
The Collection element enables you to feature a product collection on the page. First, select the collection to be displayed. Then, enter a name for the carousel and button text.
You can choose the layout for how you want your collection to be displayed on the page
When you have finished configuring the content for the module, click on the “Save Changes” button.
Contact Form
From the Elements window, select “Contact Form” and then click on the “Add Element” button.
Adding a contact form allows visitors to send a message directly to your email from your ESP+ Website.
On the form, you can add a header, body text, and button text for the element. You will need to ensure that your email address is entered in the “Send Email To” field and can enter a second email address in the “Send CC to” field.
When you have finished configuring the content for the module, click on the Save Changes button.
Embed Link
From the Elements window, select “Embed Link” and then click on the “Add Element” button.
Enter the URL for the link and click on the “Insert” button.
When you have finished configuring the content for the module, click on the Save Changes button.
Text Box
From the Elements window, select “Text Box” and then click on the “Add Element” button.
You will then be able to configure the text as needed. Use the options available on the toolbar to modify the appearance of the text.
When you have finished configuring the content for the module, click on the Save Changes button.
Tiles
From the Elements window, select “Tiles” and then click on the “Add Element” button.
You will then need to configure the tile image. Click on the “Choose Image to Upload” button to browse your computer for the image or click on the “Select from Library” button to choose an image from the content library. You can also drag and drop an image to the available box.
Next, enter alt text for the tile image. Alt Text provides browsers with a short description of the image and can be read by screen reader software.
Then, enter a header for the tile and select the destination when visitors click on the tile: an existing page on your ESP+ Website or to a new website. Set the designation for the link and choose whether this page or link should open in a new tab.
You can have up to four tiles displayed for a single element. Click on the “Add Another Tile” button to configure additional tiles for this element. If you wanted a tile image to serve as a standalone image, upload the image and add the alt text, but then leave the header and destination fields blank.
When you have finished configuring the content for the module, click on the Save Changes button.
Article Feed
From the Elements window, select “Article Feed” and then click on the “Add Element” button.
You can enter a title and a short summary for the article section if desired but have to use the article tags to designate which articles from the content library will be displayed on the page. To access the content library, click on the user icon and select Content Library.
You can use the “Amount” and “Number of Articles in a Row” to focus the content available in the section and show up to four articles on a row. To show all articles matching the entered tags, check the “Show All” box. It is important to note that all articles must be shown to enable search articles option.
Image
You will then need to configure the image. Click on the “Choose Image to Upload” button to browse your computer for the image or click on the “Select from Library” button to choose an image from the content library. You can also drag and drop an image to the available box.
Next, enter alt text for the image. Alt Text provides browsers with a short description of the image and can be read by screen reader software.
To zoom on the image or select a different focus point, click on "Focus Point". To style the image, click on "Styles"
Button
From the Elements window, select “Button” and then click on the “Add Element” button.
You will then be able to configure the button as needed. Use the options available on the toolbar to entere the button text and destination. You can style the button by clicking on "Design"
When you have finished configuring the content for the module, click on the Save Changes button.
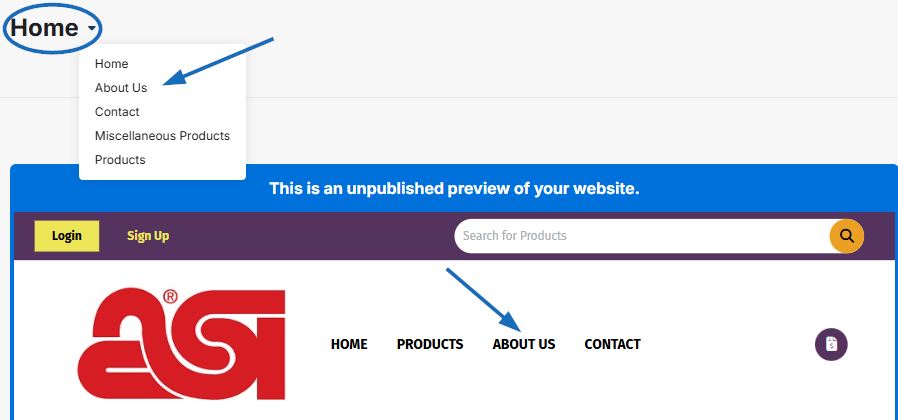
Quick Page Access
When editing a page, you can access any other page on the site to edit it by clicking on the menu item in the site preview, or by clicking on the page name drop-down and selecting the page you want to edit.
Edit Elements
To edit an element, click on the element you want to edit. You can use the up/down arrows to move the element up and down on the page, or click the center icon to drag and drop the element where you want it on the page. To delete the element, click on the trash can icon.
After clicking on the element you can make updates to the element oncent in the window on the right